

没有CUDA怎么跑模型? 快来手动编译Opencv with CUDA
环境准备
OpenCV 4.8.0支持新版CUDA(CUDA 12.x)了!!!
mingw64
- mingw-builds-binaries/releases
推荐使用
mingw64_x86_64-11.2.0-release-posix-seh-rt_v9-rev1 - 版本推荐
11.2.0。高版本或低版本都会在编译OpenCV的附加功能时会出现各种问题。8.1.0 8.5.0 11.2.0 13.1.0版本均已试验,其中11.2.0最为稳定。 posix: 在 Win 下,MinGW 必须是 posix 接口的 thread 库,而不是 Windows native thread 库前车之鉴。参照前车之鉴。
VS2019
CMake
CMake下载: 较新的版本均可。
CUDA: Cuda Toolkit + cudnn
OpenCV>=4.8.0支持CUDA 12.xOpenCV==4.8.0在编译CUDA Toolkit 12.x时存在一些函数类型的小问题,需要手动修改源码或下载dev版源码。#23948- 推荐一篇清晰全面的好文章 理清GPU、CUDA、CUDA Toolkit、cuDNN关系以及下载安装
Python
3.10.x为宜。
NO Anaconda!!!
Anaconda中的库会与CMake环境冲突,导致Opencv及其依赖库在编译和链接时存在接口、版本、内容不全等无穷无尽的问题。例如HDF5, protobuf, CUDA Toolkit等。
但凡错误信息中出现带有Anaconda/lib字段的路径,都是上述原因。
错误形式一般为undefined reference to ...。例如undefined reference to `H5Pset_fapl_mpio'。
缺少依赖库请老老实实去一个一个下载。
Linux中解决冲突的方法请参阅anaconda 库冲突问题和Linux中usr/lib 与 Anaconda环境lib冲突的问题。Windows中方法同理。
如何屏蔽Anaconda
- 可以通过修改
CMakeLists.txt中的find_package语句来解决。例如:SET (ONNXRUNTIME_DIR path/to/onnxruntime)- 暂时将Anaconda有关路径移出环境变量,或在Anaconda中移除相关库。
- (最优方案)在系统环境变量中设置指定的库路径,且一定要将位置放在Anaconda路径之前(优先级高的位置均可)。
优先级比较:系统环境变量 > 用户环境变量 位置靠前 > 位置靠后
OpenCV + OpenCV-contrib
依赖库
HDF5默认采用MSVC编译,下载的源码有现成的运行脚本和配置文件。
若想使用编译适用mingw64的链接库libhdf5.a,可以参考HDF5-with-MinGW
我的版本
CMake 3.27.5
VS2019
mingw64_x86_64-11.2.0-release-posix-seh-rt_v9-rev1
Python 3.10.6

OpenCV 4.8.0-dev
OpenCV-contrib 4.8.0
hdf5 1.10.10
eigen 3.4.0
zlib 1.3
编译
编译须知
编译前请阅读
- MinGW与MVSC编译的库文件无法共用!!!!!!!!!!!!
- 编译OpenCV with CUDA时,请使用VS
cmake/OpencvDetectCUDA.cmake里面第一行就说了if((WIN32 AND NOT MSVC) OR OPENCV_CMAKE_FORCE_CUDA) message(STATUS "CUDA compilation is disabled (due to only Visual Studio compiler supported on your platform).") return() endif()意思就是Win平台下请乖乖使用MSVC编译CUDA
- 编译选项请按个人需求勾选。使用CUDA时,需要勾选
WITH_CUDA和WITH_CUDNN。
请注意: 网上有些教程比较老,现版本OpenCV的兼容性有大提升,大部分祖传不能勾选的选项现在可以勾选了。
编译教程
个人体会: 编译中最大难点在环境搭建、依赖库的安装和版本的选择,出了问题排查费神费力。而编译操作按照教程走几乎是傻瓜化操作,没有难度。
所以,自己去找教程看。
以下提供一些看过的教程供参考。
中文教程:
windows+Cmake+MinGW+编译opencv4.5 sources安装过程以及opencv踩坑日记
OpenCV4.8 GPU版本CMake编译详细步骤 与CUDA代码演示
Windows10编译OpenCV4.8.0+contrib+CUDA
使用mingw编译opencv遇到的各种问题
Visual Stdio2022+Opencv4.8.0+Opencv-contrib+Cmake3.27.1
英文教程:
OpenCV Docs
OpenCV Issue tracking
Build OpenCV (including Python) with CUDA on Windows (推荐)
C++配置(minw64 + vscode)
以下为launch.json和tasks.json供参考
{
  "version": "0.2.0",
  "configurations": [
    { //这个大括号里是我们的‘调试(Debug)’配置
      "name": "Debug", // 配置名称 Opencv4.8.0 Debug
      "type": "cppdbg", // 配置类型,cppdbg对应cpptools提供的调试功能;可以认为此处只能是cppdbg
      "request": "launch", // 请求配置类型,可以为launch(启动)或attach(附加)
      // "program": "${fileDirname}\\${fileBasenameNoExtension}.exe", // 将要进行调试的程序的路径
      "program": "${fileDirname}\\bin\\${fileBasenameNoExtension}.exe", // 单文件
      "args": [], // 程序调试时传递给程序的命令行参数,这里设为空即可
      "stopAtEntry": false, // 设为true时程序将暂停在程序入口处,相当于在main上打断点
      "cwd": "${fileDirname}", // 调试程序时的工作目录,此处为源码文件所在目录
      "environment": [], // 环境变量,这里设为空即可
      "externalConsole": false, // 为true时使用单独的cmd窗口,跳出小黑框;设为false则是用vscode的内置终端,建议用内置终端
      "internalConsoleOptions": "neverOpen", // 如果不设为neverOpen,调试时会跳到“调试控制台”选项卡,新手调试用不到
      "MIMode": "gdb", // 指定连接的调试器,gdb是minGW中的调试程序
      "miDebuggerPath": "C:\\Program Files\\mingw64\\bin\\gdb.exe", // 指定调试器所在路径,如果你的minGW装在别的地方,则要改成你自己的路径,注意间隔是\\
      "setupCommands": [
        { // 模板自带,好像可以更好地显示STL容器的内容,具体作用自行Google
          "description": "Enable pretty-printing for gdb",
          "text": "-enable-pretty-printing",
          "ignoreFailures": false
        }
      ],
      "preLaunchTask": "build" // 调试开始前执行的任务,我们在调试前要编译构建。与tasks.json的label相对应,名字要一样
    }
  ]
}
{
  "version": "2.0.0",
  "tasks": [
    {
      "label": "build",
      "type": "shell", // "shell"
      "command": "g++", //写c++换成g++, 使用环境变量中默认的g++编译器
      "args": [
        "-fdiagnostics-color=always", // 诊断信息颜色
        // "${fileDirname}\\*.cpp", //写c++把 *.c 换成 *.cpp
        "${file}", //单文件
        "-o",
        // "${fileDirname}\\${fileBasenameNoExtension}.exe",
        "${fileDirname}\\bin\\${fileBasenameNoExtension}.exe", //单文件
        "-g", //生成和调试有关的信息
        // "-Wall", // 开启额外警告
        "-static-libgcc", // 静态链接libgcc
        // "-static-libstdc++", // 静态链接libstdc++
        "-fexec-charset=GBK", // 生成程序使用编码GBK
        // "-finput-charset=UTF-8",
        // "-finput-charset=GB2312", // 编译程序使用GB2312字符集
        "-std=c++17", //写c++换成c++标准 default: gnu++14
        "-I",
        "PATH_TO_BUILD_DIR/include",
        "-I",
        "PATH_TO_BUILD_DIR/include/opencv2",
        "-L",
        "PATH_TO_BUILD_DIR/x64/mingw/lib",
        "-lopencv_world480",
        // "-lopencv_world480d.dll",
        // "-Wl,--stack=67108864" //powershell要引号将带符号参数变为整体
      ],
      "group": {
        "kind": "build",
        "isDefault": true // 不为true时ctrl shift B就要手动选择了
      },
      "presentation": {
        "echo": true,
        "reveal": "always", // 执行任务时是否跳转到终端面板,可以为always,silent,never。具体参见VSC的文档
        "focus": false, // 设为true后可以使执行task时焦点聚集在终端,但对编译C/C++来说,设为true没有意义
        "panel": "shared" // 不同的文件的编译信息共享一个终端面板
      },
      "problemMatcher": "$gcc",
      "detail": "生成可执行文件"
    },
    {
      "label": "run",
      "type": "shell", // "shell"
      "dependsOn": "build",
      // 不使用内置终端
      // "command": "${fileDirname}\\${fileBasenameNoExtension}.exe",
      "command": "${fileDirname}\\bin\\${fileBasenameNoExtension}.exe", // 单文件
      "group": {
        "kind": "test",
        "isDefault": true
      },
      "presentation": {
        "echo": true,
        "reveal": "always",
        "focus": true,
        "panel": "shared" // "new"
      }
    },
  ]
}
C++配置(VS2019)
此处请参考网上教程,经典三个步骤:包含目录、库目录、附加依赖项
Python配置
- 编译安装
- 移除之前安装的Opencv-python和Opencv-contrib-python
- 将
PATH_TO_BUILD_DIR\lib\python3\Release\cv2.cpxx-win_amd64.pyd(cpxx为python版本号)放入PATH_TO_PYTHON_DIST\Lib\site-packages\cv2中 - 或执行
make install命令安装到预设路径
或通过VS项目生成INSTALL安装到预设路径
- pip安装
移除之前安装的Opencv-python和Opencv-contrib-python
pip install opencv-python==4.8.0.74 pip install opencv-contrib-cuda-python==4.8.0.74Pypi项目链接Pypi: opencv-contrib-cuda-python,截至写作时只有唯一版本4.8.0.74
然后就可以愉快地import cv2了
然而。。。你大概率会遇见 最可爱 的错误#19972
ImportError: DLL load failed while importing cv2: The specified module could not be found
ImportError: DLL load failed while importing cv2: 找不到指定的模块。
错误原因分析和解决方案:ImportError: DLL load failed while importing cv2: The specified module could not be found.
解决问题的尝试过程和心路历程:ImportError: DLL load failed while importing cv2: The specified module could not be found。下面是这老哥解决问题后的回复,'a good and painful learning experience',哈哈哈哈哈哈哈哈哈,我debug完也是这个心情。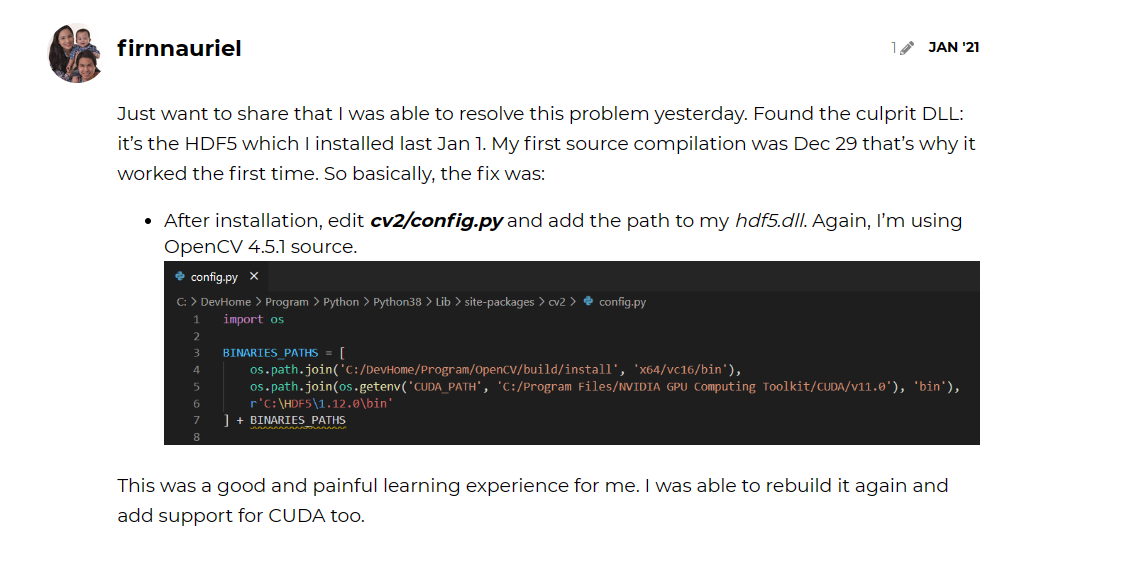
- Debug
核心思路:找缺失的dll(和报错的字面意思一样)
- 检查
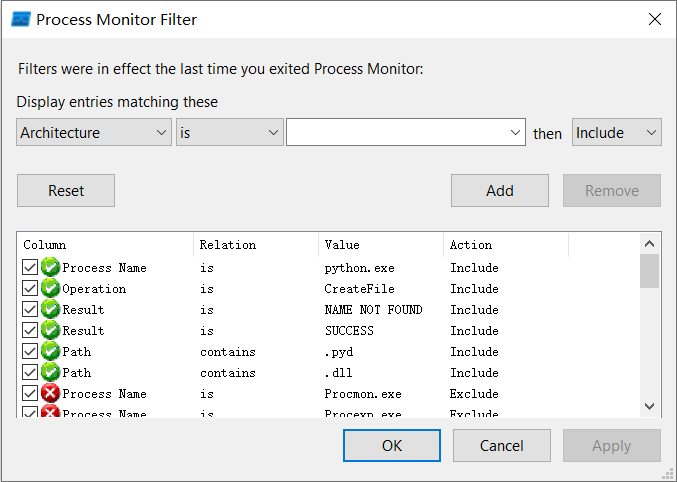
PATH_TO_PYTHON_DIST\Lib\site-packages\cv2文件是否完整,自己pip install opencv-python对照一下。文件一般都是完整的,但是看一下,免得是低级错误。 - 下载process monitor,用于查看
python.exe的相关事件,找到缺失的dll。 - 按下图配置事件过滤器
- 重启python,查看
python.exe相关事件,找到缺失的dll。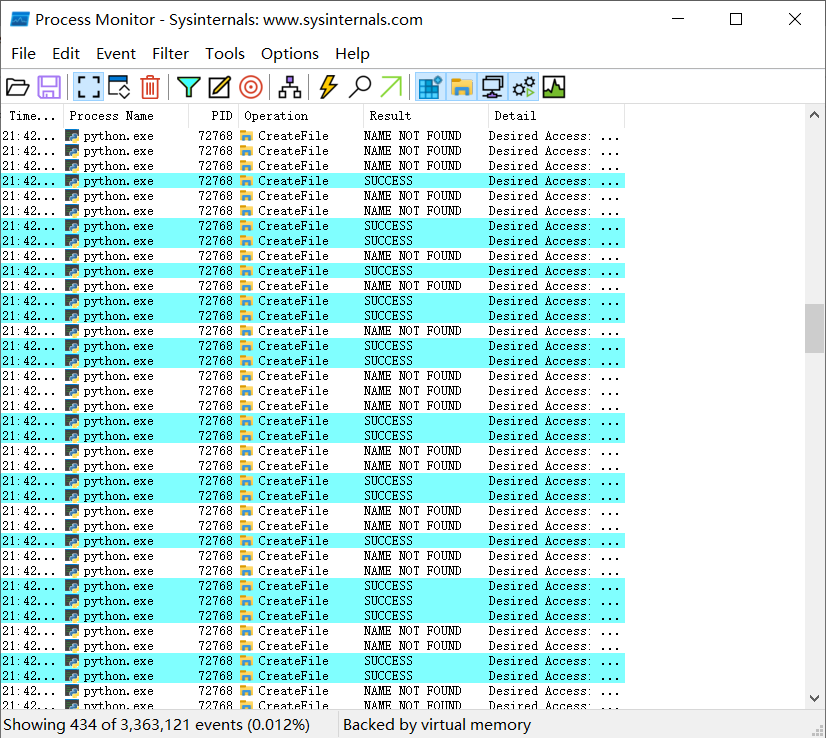
- 修复缺失dll的几种方法
- 复制到系统路径下,例如
C:\Windows\System32 - 添加到环境变量,例如
PATH_TO_HDF5\bin(推荐) - 打开
PATH_TO_PYTHON_DIST\Lib\site-packages\cv2\config.py,写入
(推荐)import os BINARIES_PATHS = [ 'PATH_TO_HDF5\bin', ... # 其他缺失的dll路径 ] + BINARIES_PATHS
- 复制到系统路径下,例如
测试
Python
- 测试CUDA是否可用
import cv2
device_count = cv2.cuda.getCudaEnabledDeviceCount();
if (device_count == 0):
    print("Error: no CUDA devices found!")
else:
    print(f"Found {device_count} CUDA devices:")
    for i in range(device_count):
        cv2.cuda.printCudaDeviceInfo(i)
输出
Found 1 CUDA devices:
*** CUDA Device Query (Runtime API) version (CUDART static linking) ***

Device count: 1

Device 0: "NVIDIA GeForce GTX 1650"
  CUDA Driver Version / Runtime Version          12.20 / 12.20
  CUDA Capability Major/Minor version number:    7.5
  Total amount of global memory:                 4096 MBytes (4294639616 bytes)
  GPU Clock Speed:                               1.51 GHz
  Max Texture Dimension Size (x,y,z)             1D=(131072), 2D=(131072,65536), 3D=(16384,16384,16384)
  Max Layered Texture Size (dim) x layers        1D=(32768) x 2048, 2D=(32768,32768) x 2048
  Total amount of constant memory:               65536 bytes
  Total amount of shared memory per block:       49152 bytes
  Total number of registers available per block: 65536
  Warp size:                                     32
  Maximum number of threads per block:           1024
  Maximum sizes of each dimension of a block:    1024 x 1024 x 64
  Maximum sizes of each dimension of a grid:     2147483647 x 65535 x 65535
  Maximum memory pitch:                          2147483647 bytes
  Texture alignment:                             512 bytes
  Concurrent copy and execution:                 Yes with 6 copy engine(s)
  Run time limit on kernels:                     Yes
  Integrated GPU sharing Host Memory:            No
  Support host page-locked memory mapping:       Yes
  Concurrent kernel execution:                   Yes
  Alignment requirement for Surfaces:            Yes
  Device has ECC support enabled:                No
  Device is using TCC driver mode:               No
  Device supports Unified Addressing (UVA):      Yes
  Device PCI Bus ID / PCI location ID:           1 / 0
  Compute Mode:
      Default (multiple host threads can use ::cudaSetDevice() with device simultaneously)

deviceQuery, CUDA Driver = CUDART, CUDA Driver Version  = 12.20, CUDA Runtime Version = 12.20, NumDevs = 1
- 比较CPU和GPU的性能
import numpy as np
import cv2 as cv
import time
import timeit

rand = np.random.random((1024, 1024)).astype(np.float32)
h_array1 = np.stack([rand, rand],axis=2)
h_array2 = h_array1
d_array1 = cv.cuda_GpuMat()
d_array2 = cv.cuda_GpuMat()
d_array1.upload(h_array1)
d_array2.upload(h_array2)

# start = time.time()
# cv.cuda.gemm(d_array1, d_array2, 1, None, 0, None, 1)
# end = time.time()
# print("Time elapsed:", end - start, "sec")

def gpu_test():
    cv.cuda.gemm(d_array1, d_array2, 1, None, 0, None, 1)

def cpu_test():
    cv.gemm(h_array1, h_array2, 1, None, 0, None, 1)

N = 10
gpu_time = timeit.timeit(gpu_test, number=N)
cpu_time = timeit.timeit(cpu_test, number=N)

print(f"GPU time: {gpu_time/N*1000:.2f} ms")
print(f"CPU time: {cpu_time/N*1000:.2f} ms")
print(f"Speedup: {cpu_time/gpu_time:.2f}x")
矩阵运算时间比较:GPU加速6倍左右
GPU time: 206.40 ms
CPU time: 1258.00 ms
Speedup: 6.09x
C++
测试CUDA是否可用
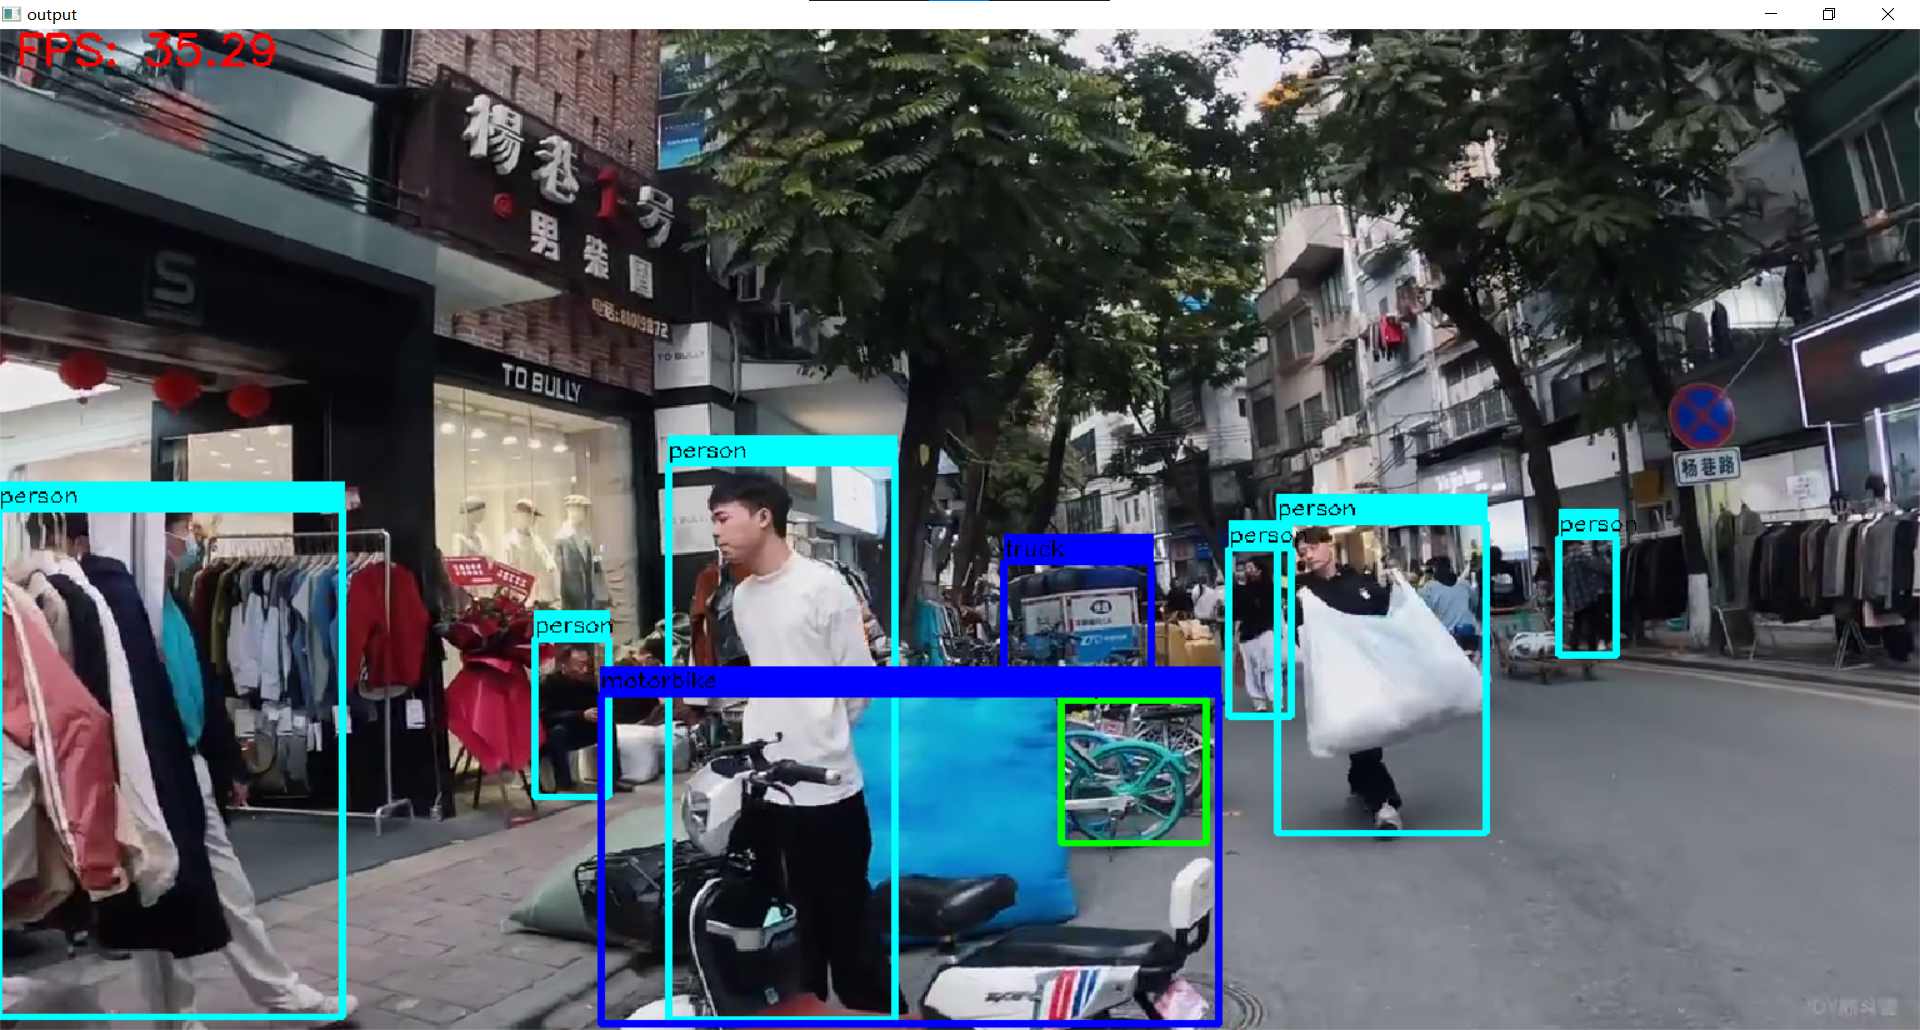
C++代码与Python相似,请自行转写。YOLOv5测试
源码:yolov5-opencv-cpp-python
源码跑在Linux平台上,编译命令为g++ -O3 cpp/yolo.cpp -o yolo_example `pkg-config --cflags --libs opencv4`自己修改的适用于Windows平台的编译命令
cl.exe .\cpp\yolo.cpp /EHsc /O2 /MT /favor:AMD64 /I"PATH_TO_BUILD_DIR/include" /I"PATH_TO_BUILD_DIR/include/opencv2" /link "PATH_TO_BUILD_DIR/x64/vc16/lib/opencv_world480.lib" /out:yolo_example.exe运行效果
结语
那么,祝贺你!!!
你已经成功编译安装了Opencv with CUDA,以后可以愉快地跑模型了。
